Search This Blog

10/14/2013

The Lawns Shrink as The Gardens Grow

Over time our lawn areas continue to shrink as our garden areas expand. Each fall, we pick an area of lawn that needs to be removed, since the garden can no longer contain the plants within its borders or mowing is a challenging. Our lawns are our least sustainable landscaping feature, because of all the fuel required to maintain them, so the less lawn area, the better.


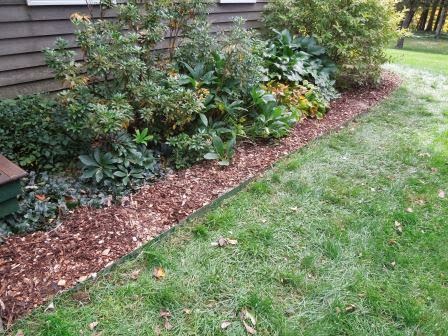
Last week we decided to enlarge the foundation border that wrapped around the side of the house, paralleled the front, and continued along a stone wall perpendicular to the opposite side. The plants were started almost 10 years ago. Since then they'd multiplied to a point they could no longer be contained in their original space. By adding a foot of garden along this 90’ border, almost 100 square feet of lawn area was eliminated, and the gardens were given growing room.  
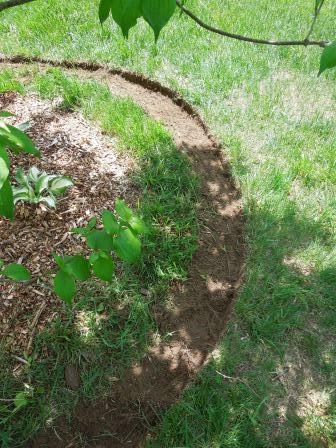
We first removed the metal edging material we'd installed years earlier. After using an edging tool to create our new boundary line, we dug down three inches with a hammer claw to create a rock-less groove to accept the metal strips. The three inch barrier will continue to block grass roots from entering the garden.  


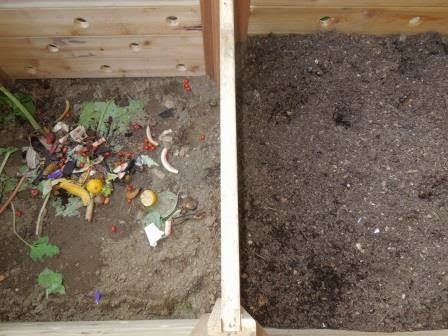
Once the edging was in place, rather than remove the sod, we covered the grass with multiple layers of recycled paper and three inches of chips. By spring the grass will die out and the paper will begin to decompose below the chips. 


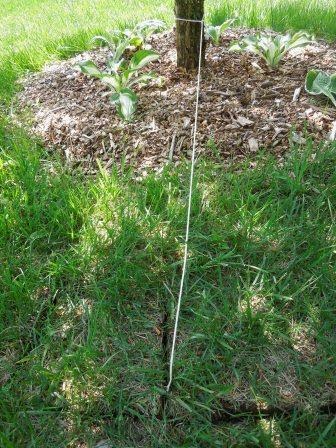
The tractor always struggled to make this tight curve.
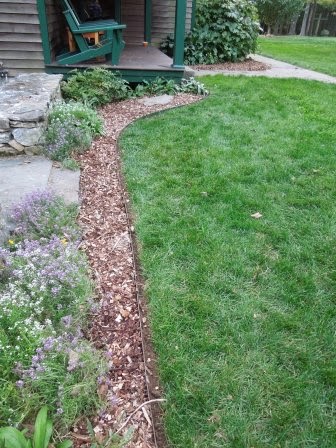
The new curve is gentler.
When we cleared our wooded lot 15 years ago to build our house, the fastest and most economical way to landscape the property and avoid erosion was to plant lawns. We've spent the years since then removing the lawns, section-by-section, replacing them with gardens, trees, patios, and walkways. Eventually, the gardens will claim majority status, as the lawns become green pathways that connect and divide them.


9/24/2013

A Local, Sustainable, Apple a Day

Do you wish you could bite into the crunchy, sweet, juicy fruit daily to follow the “an apple a day” health tip, but worry about the amount of pesticides you’d be ingesting?  Apples often appear in lists of the dirty dozen because they rank high in pesticide residue.  It’s a quandary; they’re such a healthy food, laden with excess pesticides.  The answer, of course, is to find apples that are grown with less pesticides, so the negatives don’t outweigh the positives. A trip to Fishkill Farms one of these beautiful fall days, may be part of the solution.
Invigorated by the autumn morning chill, my friend and I walked along the well marked paths--distracted by the panoramic views of distant mountains--looking for the farm’s Macoun apple trees.  


The trees were overburdened with ripe fruit, and we eagerly unburden them.


The trees were lush with appealing fruit. All the apples on the farm are certified by Eco Apple because of the low-spray, environmentally-friendly techniques implemented.  The five acre "organic block" grows crops without using synthetic pesticides or fertilizers--a rare find locally.  


Our bags were quickly becoming too heavy to carry, so we journeyed back through the beautifully laid out orchard to the farm stand. After paying for our fifty pound haul, we headed home to share a portion of the harvest with our families, and preserve the bulk of it for the winter.  Over the next few weeks, some of the apples will be dehydrated, some canned as a sauce, and others cooked down into butter. We’ll be able to indulge in the pleasures of this delicious, local, sustainably grown fruit daily, all year long.

7/23/2013

Green Dorms

High school graduation parties have winded down; seniors are flush with gift money and ready to shop for items they’ll need for dorm life. It’s a great time to check out Project Green Dorm.  This site encourages sharing, swapping, recycling and buying sustainably manufactured products for “mindful” students attempting to live consciously.  It also supplies links to dozens of companies that carry these products.


Whether it's organic cotton sheets, buckets made from recycled soda bottles, natural rubber flip flops for the shower, bamboo surf boards, or safe cosmetics; they've located companies that sells these eco-friendly products.
You can click on hundreds of items on the the Green Dorm Pinterest board to directly access ordering information.  The products are organized into twelve categories: active, bath, body, clean, food, sleep, space, study, style, technology, wellness, and waste. The links are easy to use and eliminate hours of searching through sites trying to discover sustainable products. 


Guiding students to thoughtfully furnish their dorm room with a minimal footprint, is a good way to set them up to become responsible consumers.

6/28/2013

Dehydrating The Season's Surplus


     Now that it's officially summer, my dehydrator has begun its unceasing mission, to remove water from fruit, vegetables, and herbs. It "dehydrates" so that microorganisms can not thrive and the food will not spoil.  My gardens, local farms and farm markets (Pawling's opened on June 22nd), now supply abundant produce, and the dehydrator gently coaxes the moisture from the food, to preserve it for up to a year.
    My potatoes, tomatoes, squash and bean plants are all flowering and beginning to produce fruit.  So I'll soon be blanching and slicing to preserve the garden's surplus.  The cabinets, filled with preserved produce, will sustain us during winter's scarcity.
    If live in the area and are curious about this preservation technique...

Join me for a Free Workshop on Food Dehydration

Tuesday, July 2, 2013 
at the Pawling Library (NY) 
 7:00 to 8:30 pm.
I'll share techniques for drying herbs, fruits, and vegetables.  
To register, call 845.855.3444.


6/03/2013

Dog-Proof Compost Bins

Compost is such an integral part of organic gardening; I consider it my garden's gold.  After years of attempting to train our dog to stay out of the compost bin, we finally accepted that the temptation was too great and the bin too flimsy. It was time to make a bin that would prevent our dog from scattering food scraps in the yard and allow for a larger volume of material.  We wanted an easy to construct, yet sturdy, bin that would allow for compost turning, last many years, and look attractive. We decided to build our bin out of cedar, using lumber dimensions substantial enough to ensure the bin could withstand a large volume of compost and persistent animals. The aeration holes would have to be small enough to discourage our dog from climbing the sides.  We really wanted to get away from reaching over the sides of the compost bin to dig out the compost--it's really tough on the back, so we designed a system that would allow us to remove slats, thus offering easy access to all the layers of compost for turning and transferring

With these materials:
  • 126 feet of 6" x 5/4" cedar boards
  • 30 feet of 4" x 4" cedar posts
  • 42 feet of 2" x 3" cedar 
  • 42 - 2 1/2" inch stainless steal screws
  • 108 - 2" stainless steal screws (optional)
We created the bin:
Cut the 6" x 5/4" boards into 3' lengths (total of 42)
Cut the 4" x 4" posts into 5' lengths (total of 6)
Cut the 2" x 3" boards into 3' lengths (total of 14)
Drill three 2" -  3" holes in half the 6" x 5/4" boards, and two holes in the remaining boards; 
offset the holes so that they do not line up.
Use a router to smooth the holes. (optional)
                        Using a table saw, dado the 2' x 3" board to receive the horizontal boards, or slats.
Cut bevels to a point on the post tops to allow water to run off. (optional)
Then glue and screw two - 2" x 3" boards to adjacent sides of four of the posts.
Attach three of the 2"x 3" boards to the final two posts.
Dig down 2' to position posts; when plumb, level and square, pour concrete into the holes.
If you have conditions that make it difficult to assemble the bin on site, add pocket screws to the side panels to add support while you position the panels. (optional)
Clamp together while the concrete dries.
Level the soil; slide in the remaining slats; and fill. 
Use one side for new food scraps, and the other for partially decomposed compost. 
Remove slats when it's time to turn the compost.
Now that our dog, Maggie, no longer spreads our food scraps all over the lawn, there should be more compost available to amend my garden soil next season.


5/29/2013

Shady Characters

When I first started gardening, I carefully planned gardens in the sunniest location on my property, filling these areas to overflowing with blossoms. Then, over the years, I moved to new houses that required gardens in shaded sites. Although originally frustrated that I couldn't achieve the same showy displays, I ultimately discovered that there was something appealing about gardening in the shade. Magical things happened when plants were placed under the protection of a large tree canopy
Shade prevents the soil from drying out.
Weeds are easier to control.
 Many shade plants are perennial; spread easily; and require less attention each year .
Brilliant greens stand out in the lower light.
White leaves "glow in the dark".
Glossy leaves shimmer.
Leaf textures and shapes add interest and tactile pleasure.
Subtle colors stand out, even without blossoms.
Yellow leaves radiate their own sunlight.
I've come to appreciate the subtle beauty of shade gardens. If you're just beginning to explore shade gardening, Carolyn Harstad's Got Shade and Larry Hodgson's Making the Most of Shade are excellent resources. 

5/24/2013

Mulch Tree Base with Minimal Digging

After
Before

We planted three small trees on our property 8 years ago, placing recycled tire mats around each base. Over the years we have cut away more and more of the mats' centers as the trunks' diameters have grown, and then finally removed the mats altogether.

This year we decided to enlarge all the mulch "skirts", providing protection; enabling easier mowing; and improving their appearance. Since each of the trees: dogwood, witch hazel, and Japanese maple, have roots growing close to the surface, it was important to avoid disturbing the roots. I used a modified version of the minimal digging edging technique I use for large perennial border gardens, in order to protect the root systems.

1.  I tied a string loosely around the trunk of the trees to mark the edging line.


2.  I used an edging shovel to cut a large circle in the sod around the circumference of the new skirt.  I made a second cut a shovel's width in from the end of the string.  (When I was digging down, I was very aware of the roots and avoided cutting roots that gave resistance.)  I then dug a line to connect the two circumference cuts, so it gave the appearance of a railroad track.
3.  I removed the sod with a hand held fork (cultivator), being careful to avoid damaging the roots.
(I was not able to cut as deeply into the ground as I would for a typical garden edge.)

4.  I pushed back the chips and covered the remaining sod with recycled thick brown paper...
or multiple layers of newspaper.

5. Then, added 3" - 4" of mulch to cover the paper and the bare soil.
The paper will kill the grass while it decomposes--saving me hours of digging. By covering, rather than pulling up, the inner sod, I avoid disturbing many small roots. The grass will be gone and the paper barely recognizable by next year. The mulch will protect the tree from mowers and weed-wacker; help keep the soil moist; keep weeds at bay; and look more proportionality appropriate under the larger trees.


5/04/2013

The Colors of Spring


Though there have been few April showers this year, the May flowers are plentiful. If you look closely, there are already dozens of flowers suitable for   pressing to preserve their beauty.

After hunting in my gardens for a few minutes, my flower press was overflowing with a variety of ground cover flowers, tree blossoms, freshly emerging leaves, and delicate perennials. 

Once the flowers have had a month to dry, we'll let them inspire us. 


Flower Art

Create art using a palette 

of dried flowers.

June 5th    

7:00 - 8:30 P.M.

at the Pawling Library, 

Pawling, NY


  Registration is required: 845-855-3444


Other posts on flower pressing: